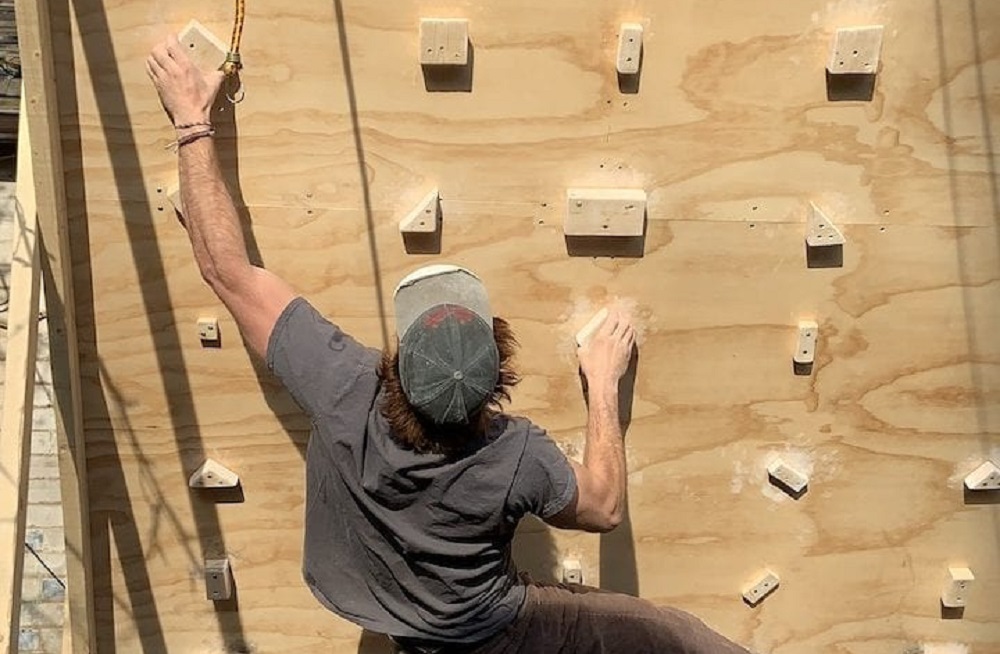
How to Build a Bouldering/Training Wall at Home
Don't want to hangboard? Build a home wall! A Toronto-based Gripped writer and boulderer takes you through one way to build one
As a lockdown once again consumes parts of Canada, many will look to their hangboards and portable pull-up bars for motivation. Building a home wall is one possible solution to the closed gym problem.
Though it is no gym ,it can be an affordable and fun solution to an otherwise difficult problem. Today, we are going to discuss a few of the ways a person might be able to build their own wall.
The Space
Before you rush to Home Depot with your laundry list of plywood orders, take a look at the space you are hoping to build in. If you are renting your space, it is possible that your landlord might not be psyched on your having a wooden liability on their property. Do with that what you will.
Each space has its advantages and disadvantages. Let’s look at two common spaces now.
Outdoors
- Advantages
- Easy to clean
- Easy to pad
- Easy to build
- You can probably build a larger wall
- You can definitely climb larger moves
- Disadvantages
- It is condition dependent
- You better be okay with climbing in the cold
- Protecting the wall is a hassle
- If you live in a city, and outdoor wall is an unlikely possibility
Indoors (whether a basement, garage or otherwise)
- Advantages
- Easy to protect from weather
- Comfortable climbing conditions
- Easy to pad
- Disadvantages
- Limited by space
- Must be constructed within the space
- You are not cutting loose in any wild way
- Can make your space rather dirty rather quickly
Now that you have assessed your space, you must pick a size for your board. Everyone has their own views on this, but our editor does not think it is worth it unless you can really climb in the space. If you find yourself pulling off the ground, doing one move, and then being at the top of the wall, it may be better to just hangboard.
The Wall
If you are building a wall outside, go big.
Materials:
- (12) 2x4x8
- (8) 2x4x10
- (5) 2x4x12
- (4) ¾ inch, 4ft x 8ft plywood
- Sealant
- Hundreds of 3.5-inch deck screws
- A couple hundred 2-inch deck screws
- Power Drill, and drill bits
- circular saw
What these measurements mean:
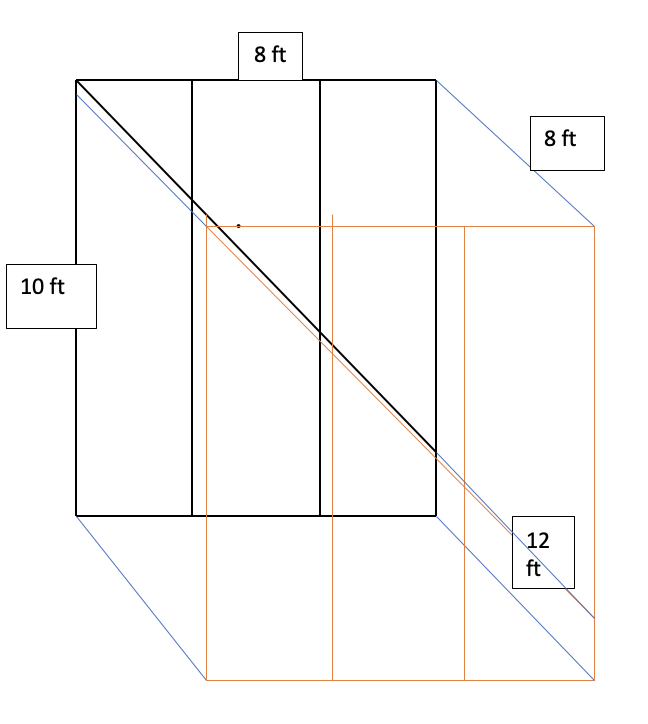
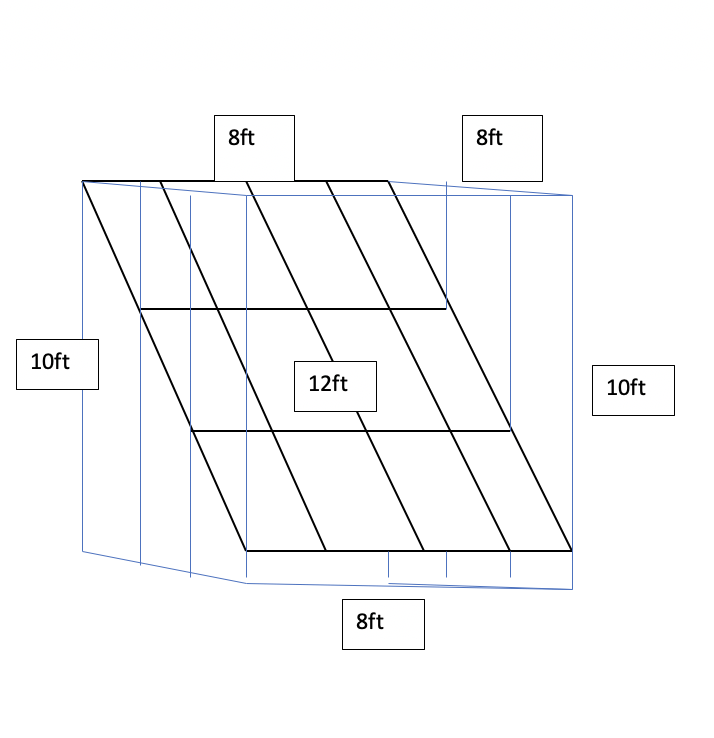
- This wall will be 10 feet tall, 8 feet deep, and 8 feet wide. The length of the angled portion of the wall will be 12 feet. If there is a kicker, it will be of a length that you determine.

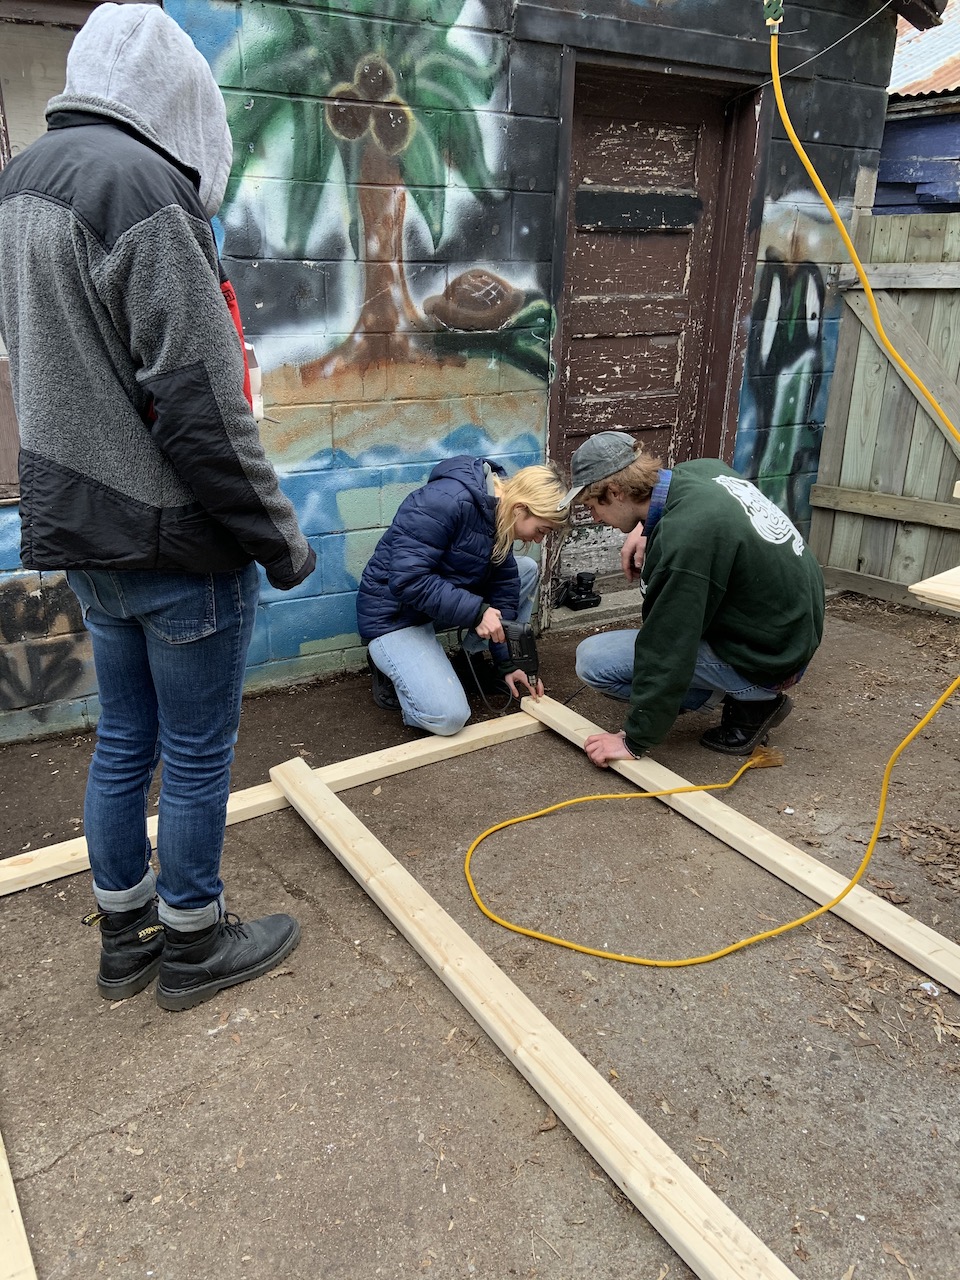
Building the sides
- Lay two 8-foot planks 10 feet apart from one another, creating two parallel lines.
- Now, lay two 10-foot planks in such a way that bridges the gap between these two planks.
- Make an 8-foot wide, 10-foot tall rectangle out of these four planks.
- It is important that the corners match up in an overlapping manner (as seen in Figure 5 and 6)
- It is important that they are overlapping the same way. For example, both 10-foot planks should lay overtop the 8-foot planks
- Take a drill bit that is narrower than your 3.5-inch screws and route 4 holes through both overlapping pieces.
- Make sure the screws are equidistant from one another. This should make a square pattern overtop the corner.
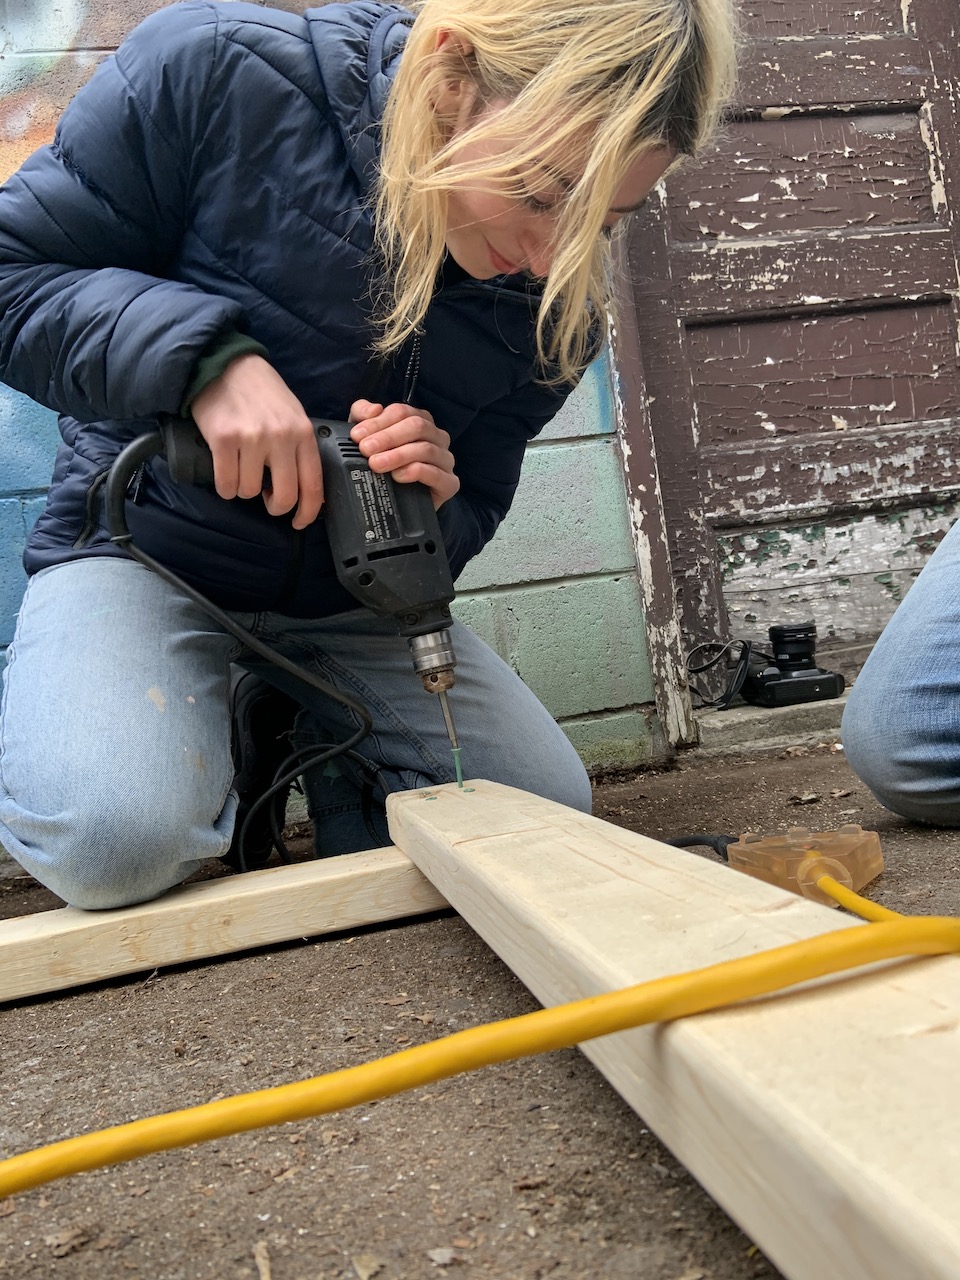
- Do this to each corner, ensuring that the corners overlap perfectly. Drive your 3.5-inch deck screws through these holes. All four corners should be screwed together at this point.
- Now place 2 more 10-foot planks between the other 10-foot planks, equidistant from one another.
- Route them and screw them in the same manner as Figure 5. Make sure the edges of the planks are flush against one another to make for a near perfect rectangle.
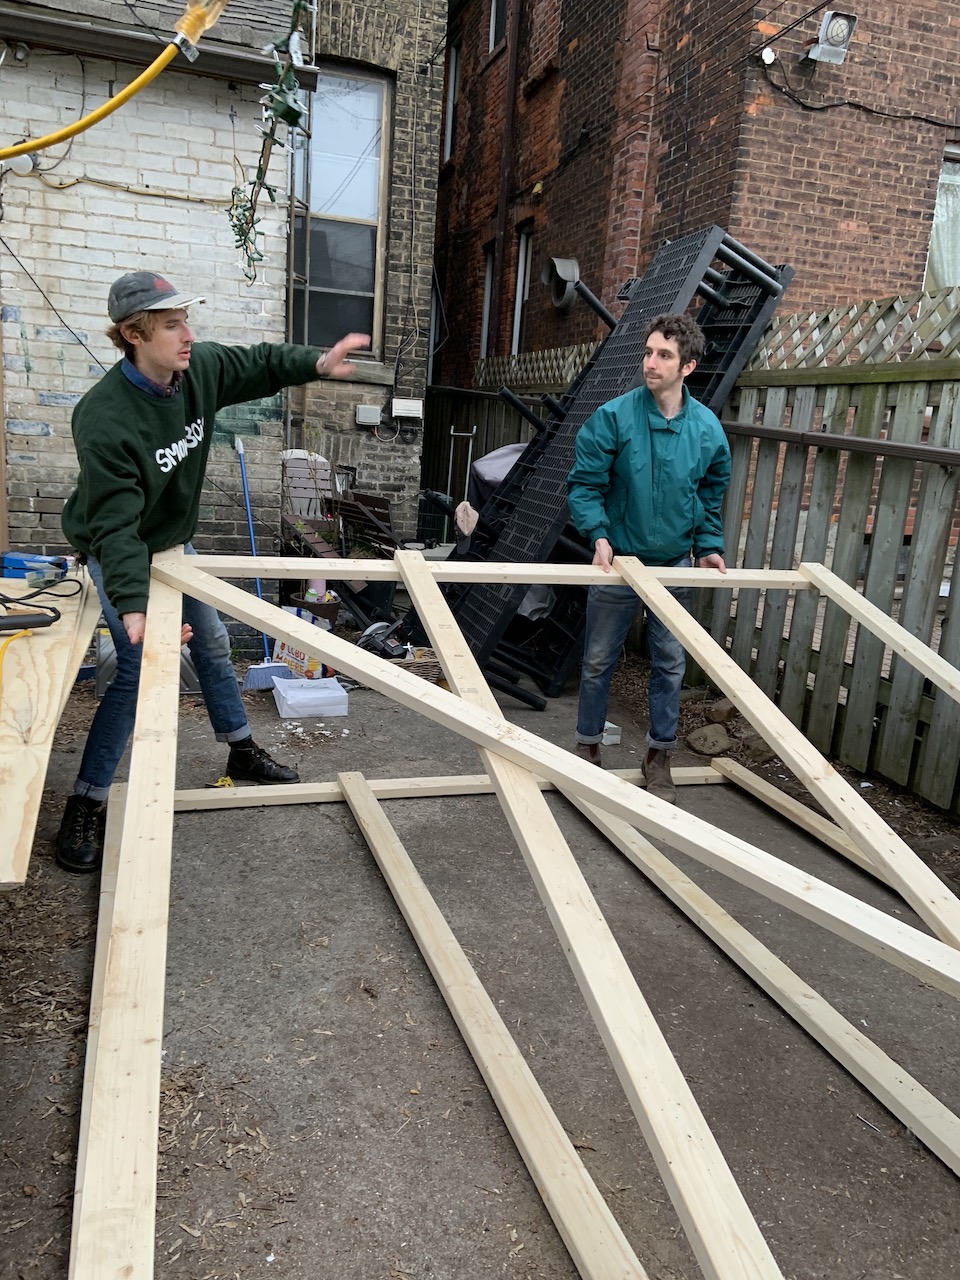
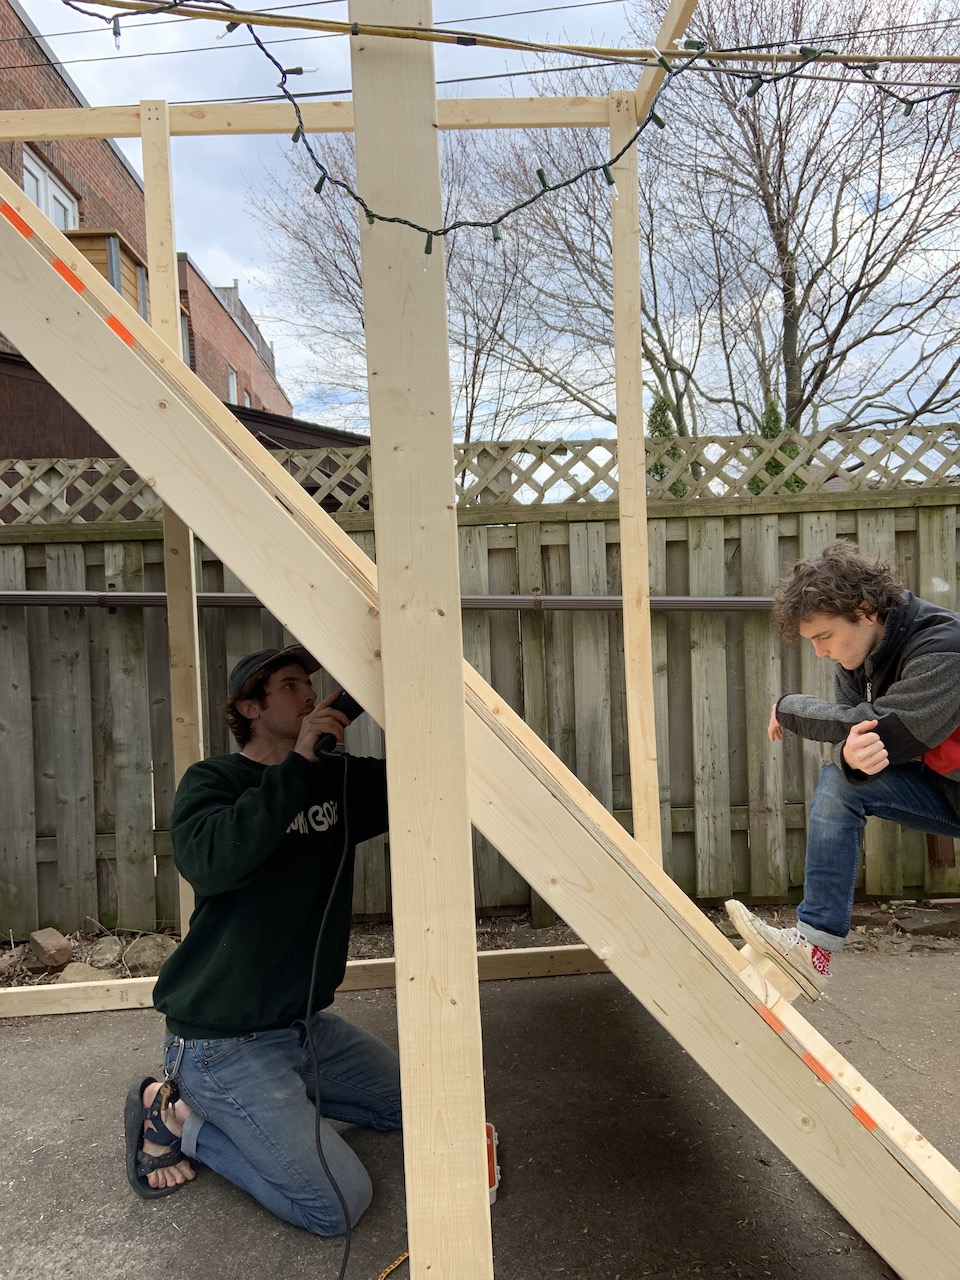
- With this complete, lay the 12-foot plank diagonally from corner to corner
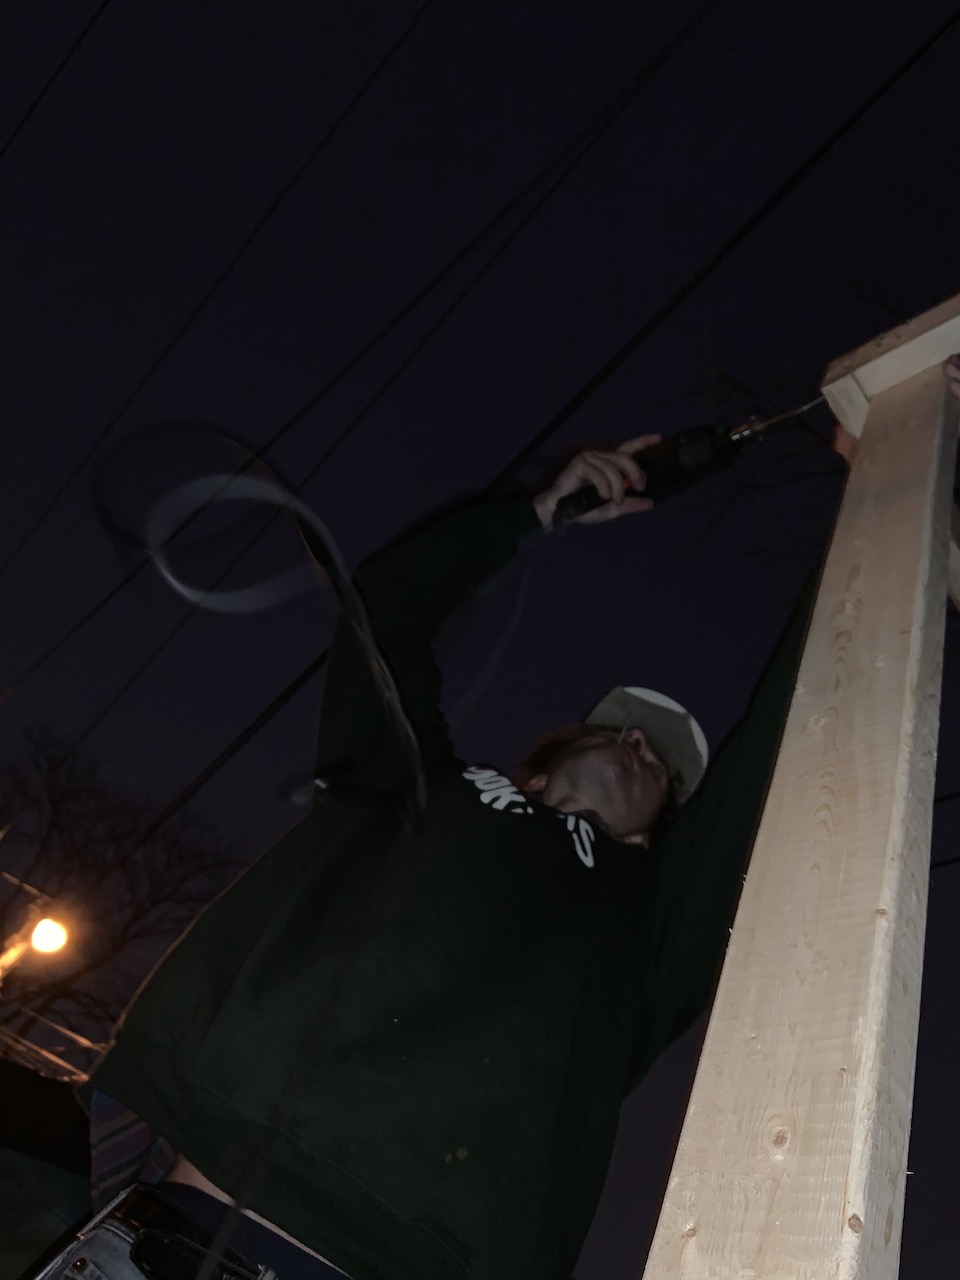
- You will notice it does not quite reach. To manage this problem, pick a corner and put one end of the 12-foot plank in that corner. This will be the top of your climbing board. Slide the other end up until it meets with the far end’s vertical 10-foot strut. When they are overlapping as much as possible, hold both ends in place, route them with 4 holes for each end. Be careful to not drill into the deck screws you place from the vertical 10-foot’s attachment to the horizontal 8-foot plank. (Check out Figure 3 for reference)
- Once routed, fasten the planks with deck screws. This diagonal will be one of two runners on which your plywood sheets will ultimately rest.
- Where the diagonal meet the verticals, route another 4 holes. Screw the 12-foot to the 10 foot at these locations
- Repeat this entire process to complete the other side. The only difference between the two sides should be the diagonal beam. The diagonal beams of the sides are intended to hold up the plywood sheets of your climbing wall as such they must reflect each other (Figure 3). Consider the term “reflect”. If the two sides are built identically, the diagonals will both face one direction. If they reflect one another, the diagonals should face each other.
- The sides are now complete
Building the base
- This part is much easier than building the sides.
- Tilt the sides so they are upright.
- Separate your two sides by 8 feet.
- Fasten the bottom corners together with a 2x4x8
- One will go at the front (the side of the wall where the open angle of the diagonals approaches you; where the diagonal meets the corner)
- One will go at the back (the side where the diagonal meets the vertical 10-foot pillar)
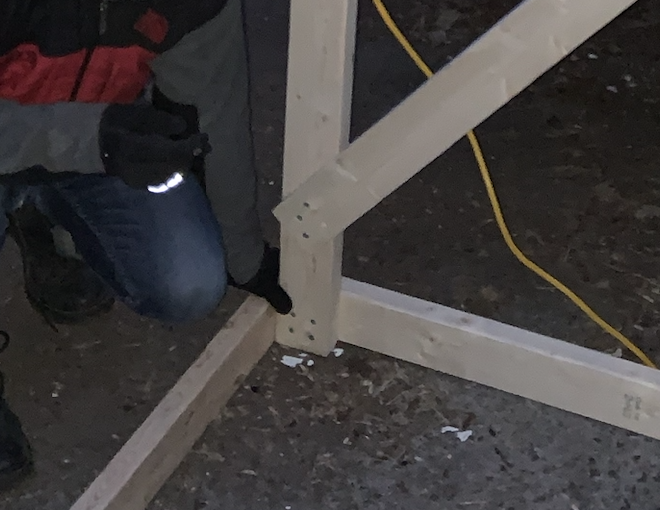
- The addition of these planks should produce an 8-foot by 8-foot square. The width of the square will be slightly smaller than 8 feet. This is because as you will be making the corners flush with one another (Figure 8). Route 4 holes and then screw.
- Your base should be complete
- Your wall should be standing on an un-rockable base, with two sides reaching toward the sky.
The backside cross bar
- Replicate your routing and screwing job on the bottom and do the same on the backend’s crossbar
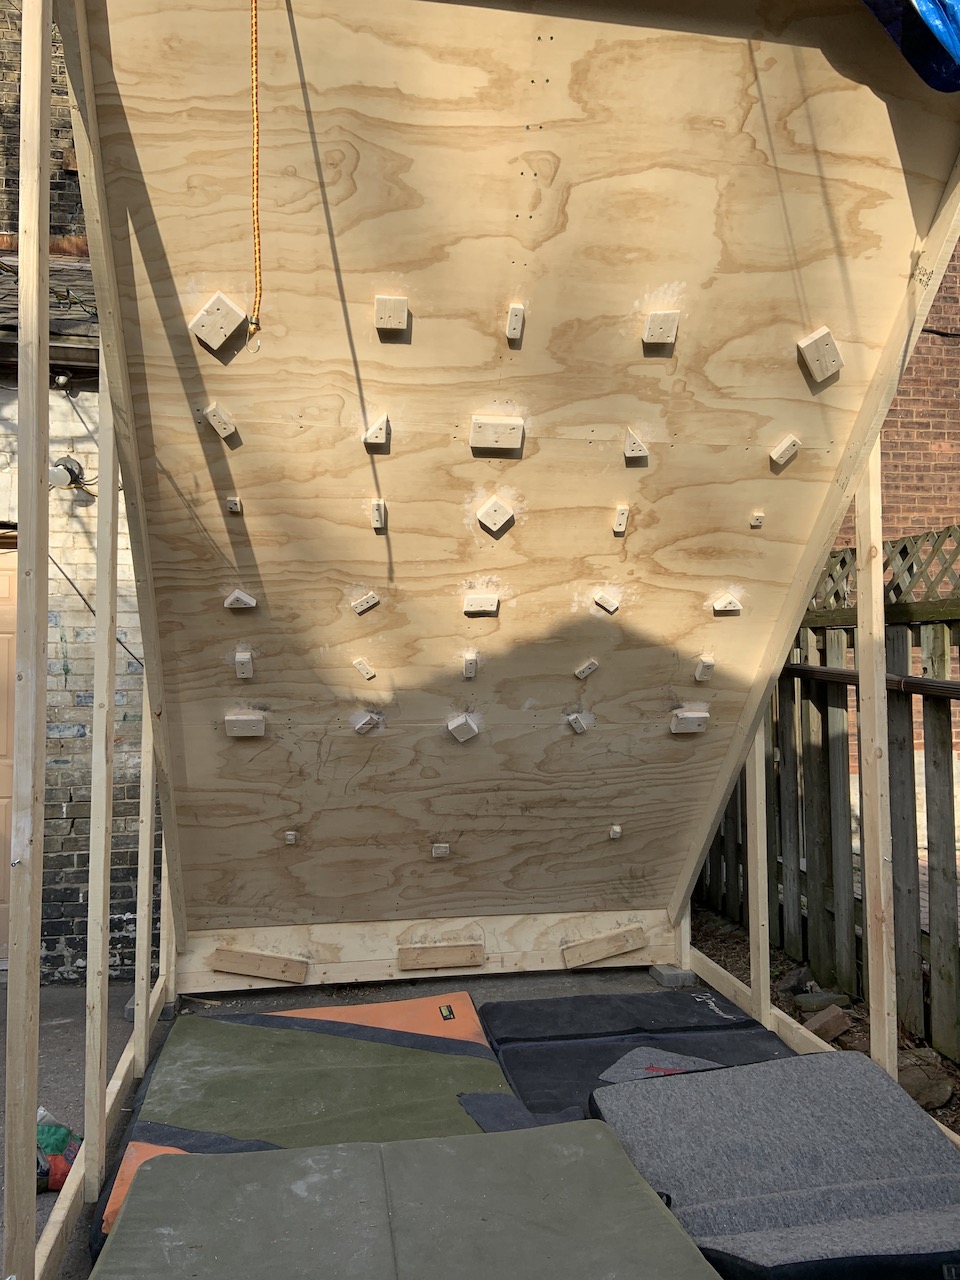
The Board (where the holds go)
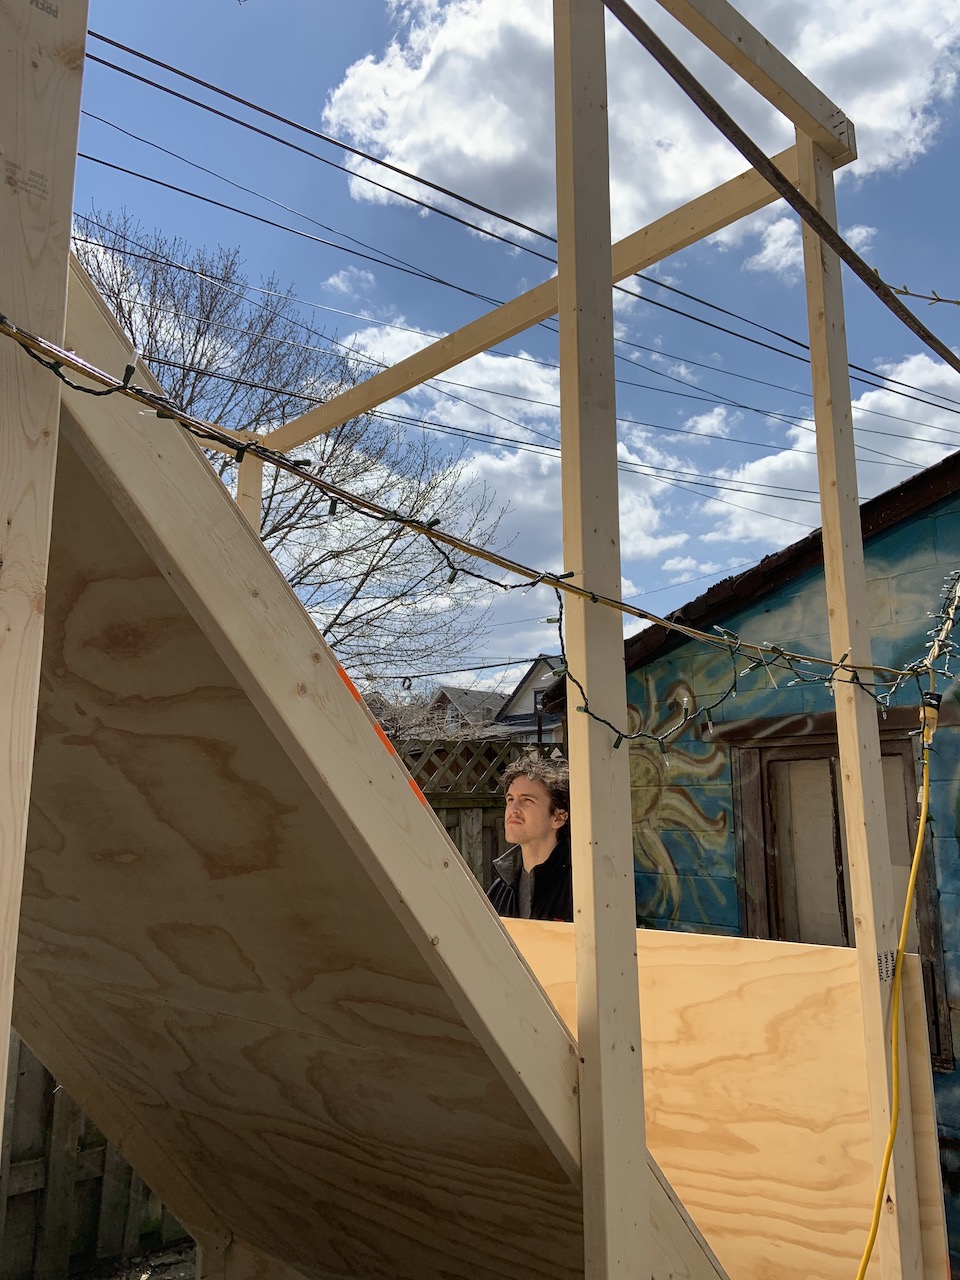
- The diagonal 12-foot beams will have created a sort of slide, angling toward the kickboard. Lay each plywood sheet on this slide, end-to-end. You should be able to lay each of these plywood sheets ON TOP OF THE 12-FOOT DIAGONALS, in such a way that the wall will look like a climbing wall, even though the plywood will not yet be fastened to the frame.
- You will notice that the plywood sheets will not quite fit on the frame because the distance between the 12-foot diagonals will be less than 8 feet (as mentioned above). Trim the plywood so that it fits snug on the frame. Do this with a circle saw (preferably) or jigsaw. Be careful to not trim too much.
- Now that each board is fit on your wall, route holes along the plywood edges overtop the 12-foot beams.
- Screw these planks in place with 2-inch screws
- Now place (3) 2x4x8 cross beams between your vertical 10-foot pillars ((1) for each pair of pillars) and fasten them to those pillars with 3.5 inch screws
- Do this for each of the back 3 pillars, but not the front crossbeam. The front crossbeam will go on last.
- Use two screws per end.
- Like the plywood, you will have to adjust the size of the beams as the distance between them will not be precisely 8-foot (Figure 3).
- Now place three 12-foot beams lengthwise along the angle of the board (Figure 3). One should go in the middle, while the other two should be equidistant from the middle to the edges. This will provide extra support for your wall.
- Route four holes wherever the 12-foot beams, perpendicularly intersects an 8-foot beam. Fasten with screws long enough to penetrate the overlapping beams without creating a hole on the climbing side of the board.
- Fasten the plywood edges to the supporting diagonal 12-foot planks that you constructed when you built the sides. Do this with 2-inch screws.
The Kickboard
- Install 1 of your plywood boards at the back of the wall. Fasten the 4-foot ends to the 10-foot verticals. It will rest on top of the posterior ground 2x4x8 plank
The Front Crossbeam
- Attach your remaining 2x4x8 as the front crossbar of your board. Do this in whatever way seems logical. Utilize 4 screws per corner if possible.

Finishing Touches
- At this point your board should look pretty close to done. With whatever spare wood you have , fasten the kickboard to the frame more securely. Using 2-inch screws, fasten the plywood to the planks. Don’t forget to route. (Figure 10)
- Sealing your board is a good idea.
- If your board goes outside, lift it onto cinder blocks to keep it away from the rain and snow.
What if you don’t have that much space?
- Just scale everything down! If you want a precise angle, there is all kinds of math you can do, but I find it easier to just eyeball it. As long as your board is more than 30 degrees overhung, you are going to be getting a lot stronger a lot quicker, you can also use a level.
- For example, the board could be 8-feet tall, 8-feet wide, 8-feet long, with 10-foot diagonals
- If you are having to go smaller than 8-feet tall, it might be worth considering whether or not a training board is for you.
- This style of board can be built indoors as well.
What about T-nuts?
- You do not need them. If you want to set specific boulders, they can be nice, but if you are building a training wall, it is probably worth building your holds out of 2x4s and screwing them directly into the wall. Wooden holds, especially those you make yourself out of 2x4s are vicious, but rewarding. If you want some polyurethane, you can always screw those onto your wall too! Only pursue T-nuts if you are willing to drop maddd money
Risks
It should be noted that our editor is not a carpenter. This is a design that worked for him and one that he feels confident in. With that said, construction comes with inherent risks both while building and while climbing. It is important to manage your own risks and ensure your board is built securely. The best way to do this may not be in line with what is described above. Build critically. If something appears unsafe, or missing, it probably is. Address it.
Featured Image by Ilya Sarossy
Check out the latest buyer's guide: