How to Build Your Own Crack Climbing Machine
Learn how to build a crack machine in your backyard with a design inspired by a New River Gorge crack climber

Crack is stacked, but extremely hard to train for. Despite the increasing number of Wide Boyz volumes present in the gym, most climbers never get an opportunity to crack climb in the gym. When they do, the sequence is often short and far from reflecting the necessary techniques required to move up a wall. Fortunately, you can build a crack at home.
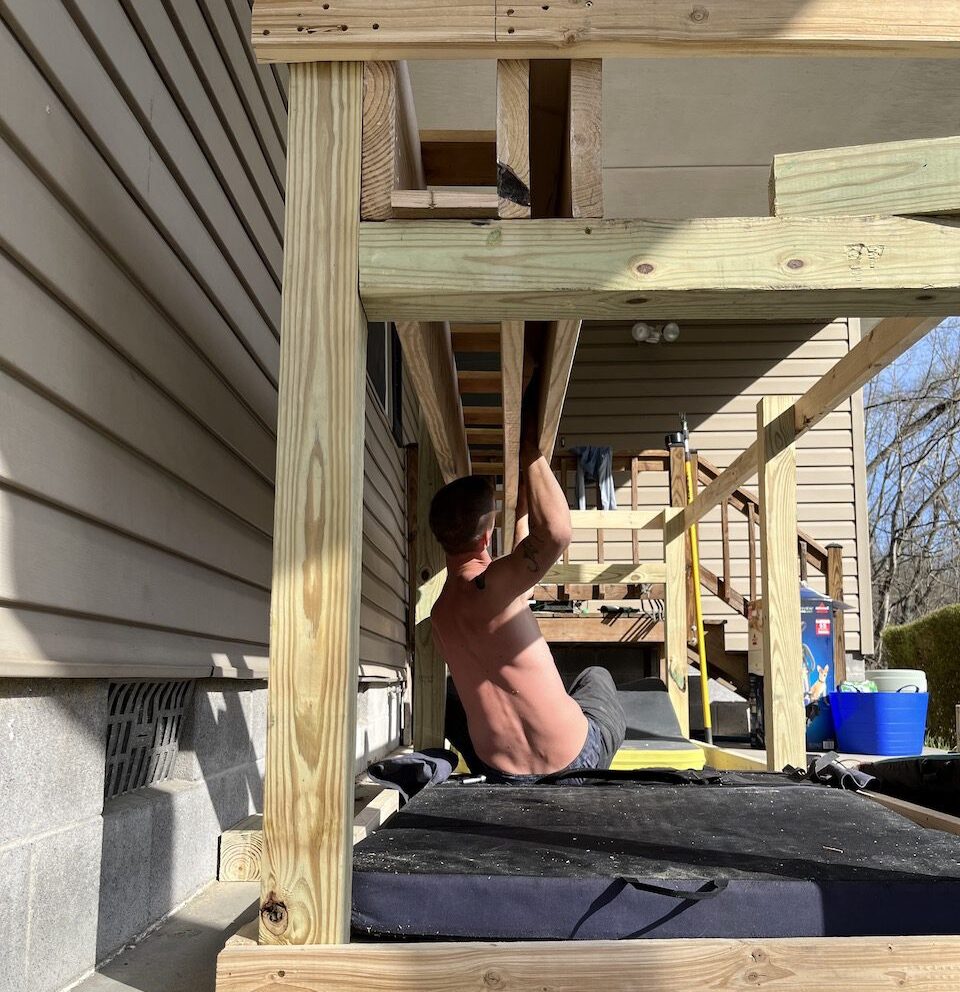
Crack machines come in many shapes and sizes. Despite their many forms, they all train the body to become comfortable with being uncomfortable in a jam. While board climbing helps the boulderer perform on steep terrain, crack machines go even further to prepare crack climbers for their ultimate project.
Tom Randall and Pete Whittaker famously embarked a=on a two year training stint to climb the cracks and off widths in the United States. They trained indoors, on wood and found the skills and strengths they learned transferred well to the real world. Although rock and wood differ dramatically ina. friction based discipline, having the strength makes learning the technique less frustrating. Today we are going to build a crack machine.
Learn how to build a home wall here.
Note:
Building a climbing structure comes with inherent risk. Ensure safe use of tools and do not climb on an unsafe structure. This is designed as an in-depth guide, though you will want to make any and all modifications you deem necessary to maintain safety and structural integrity.
Furthermore, use crashpads when operating the machine.

Step 1 – Tools and Materials
- (6) 2x4x4: (6) for pillars,
- (6) 4x4x4: (4) for pillars, (2) for buttress
- (4) 2x4x12: for frame
- (2) 2x10x12: for crack; If you want more widths, purchase more boards
- 100 3.5-inch deck screws
- Drill
- Drill bits
- Table or circle saw
Step 2 – Plan
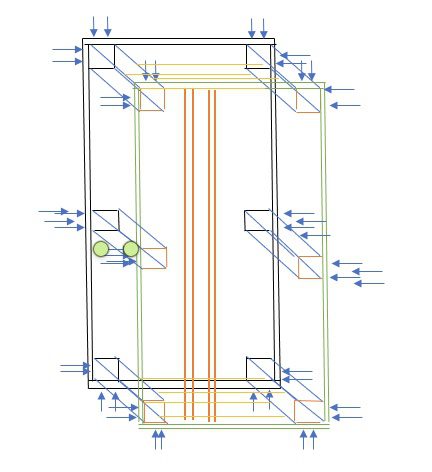
- Begin with the upper and lower frame. See Figure 1 for depiction of frame. These frames will be four feet by 12 feet
- You will connect these frames with your (6) 4x4x4 pillars
- You will now have a three-dimensional box as shown in Figure 1
- Add crack to box.
- Buttress crack.
- Seal (optional)
- Climb
Step 3 – Procedure
This will be the most confusing portion of the piece. It will break down into smaller procedures and will feature diagrams and images.
3.1
Order and purchase your materials from your local wood shop.
3.2
- Lay out the 12ft planks for your lower frame.
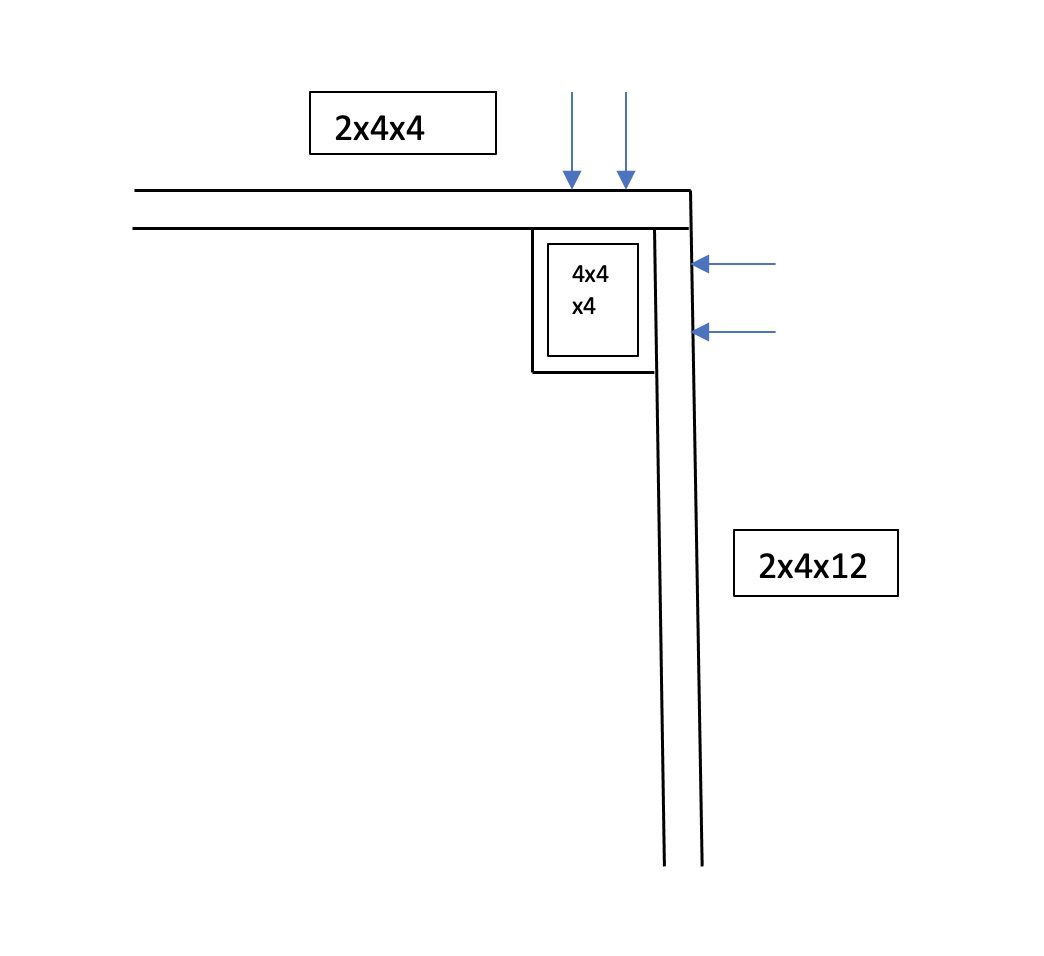
- Connect the first 4ft plank to the far end of the frame. The 4ft planks will cap the ends of the 12ft planks as shown in Figure 3. This ensures that you will be able to lay your 2x10x12 in the middle of your frame without having to make extra cuts to the wood.
- In short, it ensures fit.
3.3
- Set the wood for top frame aside.
3.4
- Place (4) 4x4x4 pillars in the bottom frame at the corners. Connect the frame with four 3.5 inch deck screws per corner.
- Pre-drill the holes before placing screws.
- Two screws should go in on each side of the corner as per Figure 2
3.5
- Attach the top frame as you have attached the bottom frame, but to the other end of the posts.
3.6
- Attach middle pillars
- Use four at each fixture point.
3.7
- Cut last (2) 4x4x4 to size and place them between the legs on the four foot side of your Crack machine frame.
- These will buttress the legs, and support the crack.
- Pre-drill and secure buttresses to frame.
- For height of buttress: you will want the top of the crack to be level with the top of the frame and the bottom of the crack to rest on the exposed portion of the buttress
- Secure buttress with four screws per corner
3.8
- Rest 2x10x12 on buttress.
- Pre-drill and secure to frame with deck screws

3.9
Your machine is now built. You can add cracks, further reinforce the machine, seal the machine from conditions, or complete other supplemental additions to its structure if you choose.
Check out the latest buyer's guide: